Championship Pro-AM for the Sega Genesis
 If you were a fan of RC Pro-AM for the NES and wanted to see how amazing it would be on the Super Nintendo, well you were completely out of luck. There is a Super R.C. Pro-AM, but don’t be fooled because it’s just a Gameboy version. However, there was a 16-bit version of the game for the Sega Genesis.
That’s right, Rare Ltd. and Tradewest, both of which are well known for their NES titles, teamed up (again) to bring the classic over to the Sega Genesis. Why only the Sega Genesis and not the Super Nintendo as well? Your guess is as good as any, but regardless that’s all in the past.
Your goal in Championship Pro-AM is to control your tiny radio controlled vehicle and finish no lower than third place in each race to continue advancing. Along the way you’ll need to collection parts upgrades, as well as letters to spell out the word Champion, while avoiding track hazards and staying ahead of the competition. If you do happen to place lower than third you’ll be given a total of three continues, but once those are used up it’s game over for good. Also, if you need to use a continue, you’ll not only retain your upgrades and letters from the previously lost race, but you’ll be able to collection additional ones once you restart the race.
Collecting tires, gears and motors helps your RC car handle better as well as makes it go faster. It’s important to collect these whenever possible as the competition gradually gets better, regardless of whether you’ve collected the upgrades or not. Collecting letters (one per track unless you use a continue) spells out the word Champion, much like RC Pro-AM spells out Nintendo. Once all the letters are collected your radio controlled vehicle will be upgraded, as will the competition’s, and your parts upgrades will be reset to none. Both upgrades and letters are strewn about the tracks and usually tend to be in fairly easily obtainable places, very rarely will you have to go out of your way to drive over one and pick it up.
Another thing the player can collect are weapons, which are activated by using the horn button. You’ll be given the choice of two weapons: rockets or bombs. Rockets can be fired directly at the competition or blind fired, in hopes to hit competition which may be off the screen. Bombs will be released with a short time delay, unless the competition makes direct contact with the bomb. Weapons affect the competition only for a short time, but if used thoughtfully it can give you a good lead. If you run out of ammo collecting stars on the track will replenish your stock, but as soon as ammo runs out hitting the fire button will simply activate the horn again, denoting you’re out of ammo.
If you thought racing an RC car around a track was going to be a cakewalk, think again. Not only does the competition get increasingly difficult, but the track is your enemy too. Anything from rain clouds and water puddles slowing you down to oil slicks that will send your car spinning out of control. There are even elevating walls that will pop up in front of you and cause you to crash like a Crash Test Dummie. All hope is not yet lost, as you will sometimes find a roll cage on the track, temporarily making your vehicle impervious to damage. Sadly this too goes for the competition and renders them impervious too, even to your rockets and bombs.
Learning to race each track is essential. Learning to drift the corners, collect the upgrades and letters, and avoiding all the hazards are all important. In terms of difficulty Championship Pro-AM isn’t much more difficult than good old RC Pro-AM, if at all. Other than holding a different controller, the obvious graphics and sound changes, it feels pretty much the exact same. They even kept the trophy room between races, but added shelves and made it look more organized. RC Pro-AM is a nostalgic blast from the past and always will be, but it would have been great to see Championship Pro-AM for the Super Nintendo. Regardless of why it’s only on the Sega Genesis it’s still very much a fun game to play.


DIY Sega Genesis and Master System AV Cables: Redo!
A few years back I made a vain attempt at making Sega Genesis and SMS AV cables. Although they did work, they didn’t last long because the connectors I used were harvested from MIDI cables and never properly adhered back to the plug. A few good uses later and both sets of cables were rendered dysfunctional or completely useless.
As I hinted at, in the original article, 5 pin DIN connectors are often sold online, and after a short search on Amazon I found a pack of 6 for less than $4 shipped. It took a while to arrive but finally it’s time to make yet another attempt at creating these AV cables.

First thing to note is you get what you pay for. These connectors aren’t of the greatest quality; the part holding the 5 pins melts slightly under even normal soldering conditions and the pins can move forward or backwards slightly. The metal parts and connector seems sturdy enough but the plastic shroud is soft plastic with absolutely no grip whatsoever, which is why I will strongly advise using the strain relief provided on the metal part.

These connectors easily disassemble into four parts, allowing for quick and easy soldering while also making the finished product far more secure than the harvested connectors I haphazardly used originally. At first I wasn’t entirely sure how well these would go together, but after the first one they started going together quite well. Something else to note is that I’m just now making them, so I can’t speak on terms of how long these things will last, but assuming you’ve properly soldered all the joints, used good quality AV cables and only hook your console up and leave it in place, these should last for a long time.

Genesis AV Cable Pinout
With the color coded pinout above you should be able to make your own Sega Master System or Genesis model 1 AV cables. Even with my soldering skills being average I managed to put together two sets fairly quickly. I would highly suggest using AV cables with a shielded video cable though. Only one of my sets of AV donor cables had the shielded video side and it makes a big difference.
You can make them as long or as short as you need. Sadly, to my knowledge, there is no way to get stereo sound from the back output of the Genesis model 1, but if you want to make video only cables and use a 3.5mm to stereo cable in the headphone port on the front of the Genesis model 1, that is differently possible with these plugs as well.
And here is the finished product

DIY Sega AV Cable
When it comes to hooking my consoles to my TV, I’ve always preferred the simplicity of a good, old RF adapter. Sure they’re not the best, but they get the job done; audio and video sent from the console to your TV, that’s all I really need! But as consoles started removing the RF option in favor of the proprietary AV cables, I was forced to hunt down AV cables through my many trips to thrift stores.
Nintendo RF adapters are usually found in bounties, and the Nintendo AV cables, used for the SNES, N64 and Gamecube, aren’t too far behind, as they’re used across more than one console. But when it comes to cables that are almost impossible to find, Sega reigns supreme! I do own a few various RF adapter for my Sega consoles but I could never track down a single set of AV cables that work for the Master System or Genesis model 1.
I could easily buy a set online for $5 or so, but I’m a person who prefers to go the cheap route, because that saves me cash that could go toward buying move video games. So instead I decided to pickup a few things from the local thrift stores and attempt to make my own Sega AV cables. The ingredients are simple, and any thrift store should have these supplies fairly cheap, although there may be an easier way than I’m doing this.
To start you will need a male DIN 5 end, either from an old computer cable or a ready to solder kit readily available online from various stores. Secondly you’ll need a working set of mono AV cables, it doesn’t matter what color the ends are, but make sure you understand which is audio and which is video. You will also need a soldering iron, solder, hot glue (optional), and a little bit of skill and patients.

If you’ve bought a ready to solder kit you can skip this part. I prefer to do things the hard way, so I had to take the rubber shroud off the DIN 5 and hollow it out to allow access to all the places I would need to solder. Also to allow me to slip it onto the AV cables before I soldered everything together.


Once the rubber shroud was hollowed out, I slipped it over the AV cables so I could easily slip it back over the end, after everything was soldered together. Now you will see the end of each plug sticking out of the back of the DIN 5 connection. Here is the correct pinout for the Sega AV cables:

Once you’re confident you know what goes where, strip down both of the AV cable wires and tin them with solder, to make things much easier. Make sure to wrap and tin the spare copper wire together, this will be the ground wire. After that add a little solder to each of the three pin ends you’re going to need to solder everything to.

Wires stripped, tinned and ready to be soldered to the pins!
If you’re not sure which wire is which, and you have a multimeter, I suggest you check which wire is which before you solder them down, to avoid mixing them up. If you do manage to mix them up its not the end of the world, you can either resolder them or you can just paint the cables or ends to note which one is which.

After you’ve soldered everything together you should see something that looks like this.
I personally like to use a dose of hot glue after I’ve soldered everything and let it set, I believe this helps avoid connections shorting out on each other. Also I use a good bit of hot glue to stick the rubber shroud back in place.

The end result is a working, albeit mono, set of AV cables that work with both the Sega Master System and the Genesis model 1. Again, this isn’t the cheapest method, but I simply couldn’t find any AV cables at my local thrift stores. Being a DIY person I figured I would rather setup a project and get the gratification of building something myself, rather than the stress of waiting a month for AV cables to arrive from China.
Sega Genesis Model 3 — by Majesco?
By 1998 the Sega Saturn was fading away, leaving Sony and Nintendo to rule the market. By the end of that year the Dreamcast was out in Japan and hitting big, but what would Sega offer the North American market to tide us over? The answer to that question is absolutely nothing, but they did allow someone else to give us the Sega Genesis 3!

Boldly calling itself a Sega, how cute.
Even though the Sega Genesis 3 says Sega right on the console it was actually made by Majesco, under license from Sega. The console itself is very basic, inside and out, but does function as a basic Sega Genesis. When I say it functions as a basic Genesis I mean that it will play most games, but it does have a list of things that it can’t do and games it won’t play. Most notably the Genesis 3 is missing any port to hook it up to a Sega CD, so that’s out. The Genesis 3 also, from what I understand, has a stripped down and rearranged motherboard, although I’m told they used the same chips, making it incompatible with the 32x add-on and even Virtua Racing. I have read, however, there may be a quite substantial mod to make the Genesis 3 compatible with the 32x and Virtua Racing, but still not the Sega CD.

Not a terrible design, actually.
Although it is much smaller and lighter than any of its first party brothers, the Genesis model 3 only slightly feels like a third party console. Every controller I’ve tried with the console works properly and every game I’ve tossed in has fired up without any issues, just the same as they did in my model 1 and 2, with the exception of Virtua Racing. But another cost cutting feature is the lack of a power LED, instead there is an orange sticker under the power switch. I’ve never been one who needs an LED to tell me my console is still on, which seems to be a popular, and if you ask me redundant, modification to all consoles without one.

AV and Power inputs
I purchased my Genesis 3 with no hookups so I had to improvise; the Genesis model 3 will work off the same AV/RF adapter(MK-1632) as the Genesis model 2, as well as the MK-2103 power supply. My only issues with this were that the power supply often slips out of the console and the system seems to get warm over extended periods of play, so far with no ill effects. Another small gripe is the death grip that it puts on the cartridges once inserted. If the system wasn’t so small it wouldn’t be an issue, but I do find having to pick up the whole console to remove a game half it’s size a bit of an annoyance.

EA cartridges are almost the same size as the console.
I’ve been told the Genesis 3 will play the majority of Mega Drive games, but since the only Mega Drive game I own is PAL I’m still unsure if this is true or not. During testing the system went to the initial license screen and then just went black, after a few more tries the system just offered me a totally black screen, no more licensing text. I now assume they were referring to Japanese Mega Drive games, which I would love so I could possibly expand my library without having to mod my other Genesis consoles.
In today’s gaming market I feel that the Genesis 3 is missing too many functions (ie: 32x, Game Genie and a few games) to really compete with how cheap the official Sega Genesis consoles can be found, perhaps that was the view back in 1998 as well. From time to time I do enjoy pulling out the Genesis 3 and using it, just to give it a good jolt of power. As a functional console I think the Genesis 3 is ok, but it surely won’t take precedence over my model 1 or 2, unless I need it to play Mega Drive games.
Since the Genesis 3 is harder to find than the model 1 and 2 its more of a fun little conversational piece. But Majesco didn’t stop there, no, Majesco also secured the rights to make their own Sega Game Gear! Maybe I will have to sit down and give it a thorough testing and comparison next, we’ll soon find out!
Peripheral Vision: Quickshot QS-150 Intruder 3

Quickshot is a name that almost every vintage gaming fan will no doubt be aware of. Whether you had Quickshot peripherals, knew someone who did or are just getting into collecting and find them almost everywhere, Quickshot still seems to be a third party brand from the old days that you just can’t escape. Quickshot is perhaps best known for their plethora of joystick based peripherals, but today I will be taking a look at the QS-150 (aka Intruder 3), which is essentially a flight stick for the Sega Genesis.

The Quickshot QS-150 is massive in size and unless you have a table, or some other surface, readily available this beast isn’t very comfortable to use. Not to say that its impossible, but its large and the flight stick takes slightly more torque than Quickshot’s other joysticks to get it to work, making the suction cups on the bottom a real necessity. Once you have the Intruder 3 set firmly on a surface and ready to play, though, you’re in for a thoroughly enjoyable experience.
The Quickshot Intruder 3 is obviously geared toward flying games, so while testing it for this review I decided to stick with that theme, for the most part. First up was F-22 Interceptor; the Intruder 3 did well, but where it really helped was the immersion factor. I felt as if it were more of an arcade experience as opposed to some dork sitting in his room testing a controller for an online review. Next I gave Desert Strike a whirl, but since the Strike series has always seemed to have a bit of a counter-intuitive control scheme the Intruder 3 didn’t seem to make things any better, although again it did push along the immersion.
To be silly, I mean thorough, I tossed in Sonic the Hedgehog (the first one). The Intruder 3 actually did surprisingly well, although the game doesn’t require more than the D-pad and a single button for action; it only felt slightly awkward, but I still prefer to use a normal Genesis controller. Lastly I popped in Lethal Enforcers for the Sega CD, and I know what you’re saying already, “Its a light gun game you moron!”, but that’s not strictly true as I’ve been playing it with a normal controller since I got my Sega CD. So how did the Intruder 3 do on Lethal Enforcers? I don’t ever wish to speak of it…

Being a massive fan of the NES Advantage I’ve always felt Quickshot’s Maverick series of controllers borrowed heavily from that, so I always enjoyed the Quickshot Maverick joysticks. The Intruder 3, however, seems to borrow slightly from them both but adds a few details to push immersion along even further; most notably the use of a realistic flight stick. The action buttons are located on the flight stick where we would imagine the fire buttons on a real jet fighter would be located, even offering a cover to make the player feel as if the B and C buttons are important. However the C button is left out when it comes to the turbo levers, which offer a few different levels of turbo, why they left C out is beyond me.

In keeping with stealing ideas from the NES Advantage, the QS-150 offers both a slow motion and quick switch from Player 1 to Player 2, on the main panel. Another great feature is the super easy to figure out plug system, as they’re completely separated as well as clearly labeled on the front of the controller, absolutely no confusion, unless you’re completely mindless.

My only real gripe with the Intruder 3 is its size. I mainly keep it in a huge box, hidden under other controllers, because I don’t always feel like lugging it out and utilizing it when its so much easier to grab a 3 or 6 button controller and do the exact same thing. Although I do feel that we shouldn’t hold my laziness against the Intruder 3, because it does its job and does it well.
Radica Ghouls n Ghost & Street Fighter II Plug n Play
After taking a quick trip to the Goodwill Outlet store I found the final piece of the puzzle. Yes, I finally found the last Radica Sega Genesis Plug n Play for my collection, unless I find out they made more. This one varies from all the rest in a few ways, but in more functional ways than the OutRun 2019 I reviewed last time.
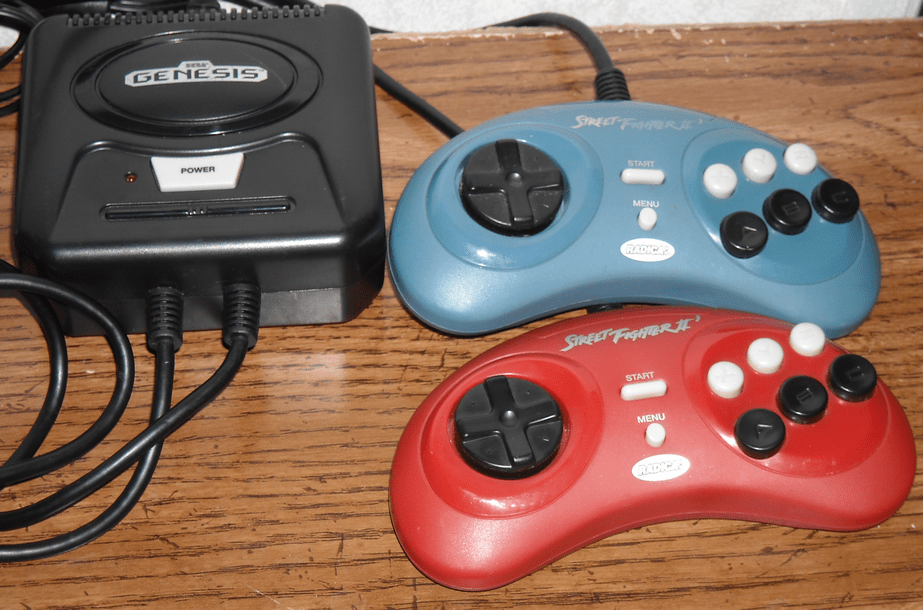
Firstly you will notice the two controllers sticking out of the system, instead of just one, as well as the Street Fighter II logo adorning both controllers. Radica decided to save space by using the smaller (model 2) style Genesis controllers, player 1 in red and player 2 in blue. But this time Radica gave us both Street Fighter II and Ghouls and Ghosts, two games that offer a 2 player mode and make full use of having two controllers hardwired to the system.
But soon after putting the controller in my hands, I immediately had a pair of problems. The first is the blatant fact that these controllers are obviously smaller than the Genesis controller of this shape; they’re comfortable don’t get me wrong, they’re just smaller. The second is a major issue I’ve voiced many times with Famiclones, and other systems alike, that put the Menu/Reset button right where I expect the Start button to be.

Although placed slightly below the actual Start button, in a hurry to get the phone, take a bathroom break or even just simply not paying attention this is TOO CLOSE to the Start button to avoid! And not only that, but both controllers have a Menu botton, this means either player can accidentally hit the Menu button and screw up a whole game. Perhaps Radica should have made use of where the Mode button on the Genesis controller was for their Menu button, but its too late to complain about it now.
Radica did an ok job on these little systems, but I have seen modders take a crack at them and add cartridge slots, enabling them to play almost any Genesis cartridge (I assume they become essentially a Genesis 3). As these systems are pretty much a Genesis on a Chip (Genechip? Take that and use it freely, just remember where you learned it!) this particular system would be the best one to modify, having 2 controllers. But with how plentiful the Genesis 2, the system these are modeled after, are on the market, you’re better off with the real thing.
I won’t go into any detail about Street Fighter II or Ghouls n Ghosts, as I’m sure we’re all fairly familiar with these games by now. I will however say that I wish Radica had chosen more games with two player modes to put in here and didn’t market it so heavily as a Street Fighter II machine. I’m not a Street Fighter II fan, so the game that I like most in this system doesn’t get top billing, nor does it even get honorable mention (or mentioned at all) until the title screen!

Sure these systems aren’t vintage, but the system they’re inspired by and the games they offer are. If nothing more than a fun novelty to own I would collect many more of these systems, had Radica made more. But on the practical side, these are far easier to pack for trips than the real thing.
OutRun 2019: Radica Plug n Play
Yet again I found a Radica Plug n Play system, but this one is different in 2 respects. Firstly this one is a dedicated system, as it only has OutRun 2019 built in, as where the previous two had six games each. Secondly, and most notably, instead of a normal Genesis controller this one offers a pseudo steering wheel.

The system looks the same, but that controller is WILD!
Now I said pseudo steering wheel because from the look and feel of it one may assume the wheel is analog, but once I took the controller apart I found it only has 2 contact points, making essentially a two direction D-Pad. Another issue with the controller is that in the heat of racing and trying to keep your car on the track, the wheel portion feels weak and I often found myself letting off to avoid breaking the controller, leading my car off track and losing valuable time. However, you don’t need to use the wheel part to steer as you can use the D-pad on the face of the controller, but its too cramped to be comfortable, let alone any real use, subconsciously forcing your hand back to the wheel.

The C button is on the back, for some reason.
Stepping away from the controller and onto the game, OutRun 2019 is a fun game, albeit a bit removed from the rest of the series. OutRun 2019 was developed by a completely different company, but still published by Sega. Despite that you can expect pretty much the same experience as any other OutRun game.
OutRun 2019 is, obviously trying to be, a futuristic version of OutRun, in which you race through the course trying to beat the clock. My only problem with this is that the cars look slightly futuristic but the tracks and environments all seem to be modern day. Other than this slight oversight, again, the game plays just as the same as any other OutRun.
You still pick which direction you want to go to complete the course, but this time there are roads with two tiers, causing you to be more cautious as to not fly off the track. Also something new is if you max out your speed for a certain period of time you will receive an automatic turbo boost. This is pretty neat, but usually speeds the car up too much causing me to let off the gas within seconds to take a turn, really rendering this feature useless.
I have noticed OutRun 2019 seems to be a bit more forgiving in the wrecking department. Almost anything in OutRun that would send your car flying off the track, causing you to wait for it to recover, seem to merely cause your car in OutRun 2019 to spin around, quickly recovering and back on track with minimal interruption. Although the game handles much the same as OutRun, I can’t really connect with it as much as I do the other games in the series I’ve played.


